


If you've never developed a mobile app before, but have some experience in React, the combination of React Native and Expo is a great way to get started.
While Android uses Java and Kotlin for their apps, React Native lets you write your code entirely in JavaScript. Expo is very similar to create-react-app, in that it allows a super quick and easy setup. It abstracts away most of the configuration details, so you can fully concentrate on developing.
I'll have to eject from Expo at some point, and switch from their "managed" to "bare" workflow, but for the purpose of getting familiar with React Native, I'll stick with the managed workflow for now.
📱 Setup
You can get started with two lines. I'll call my project rn-basics because it's supposed to be a playground for exploring React Native components and navigation.
npm install --global expo-cli
expo init rn-basics
When you initialise the project, Expo will ask you to pick a template. The first option "blank" sets up an (almost) empty example app in managed workflow. Once it's done:
cd rn-basics
npm start
It'll open your default browser, where you can choose "Run in web browser" to get a preview of the app. However, developing with the browser preview sometimes doesn't show the actual layout of the page, as it looks on a real device.
Expo Go
To see a preview of the app on your phone, install and open the Expo Go App. After npm starting the project, it'll show you a QR code to scan. Changes in your code will be immediately visible on your phone.
📱 The Starter Code
Checking the main file App.js, it'll look very familiar - the learning curve for React Native is quite shallow if you already know React:
import { StatusBar } from 'expo-status-bar';
import React from 'react';
import { StyleSheet, Text, View } from 'react-native';

export default function App() {
  return (
    <View style={styles.container}>
      <Text>Open up App.js to start working on your app!</Text>
      <StatusBar style="auto" />
    </View>
  );
}

const styles = StyleSheet.create({
  container: {
    flex: 1,
    backgroundColor: '#fff',
    alignItems: 'center',
    justifyContent: 'center'
  },
});
The main differences are:
Instead of working with HTML elements, you use React Native components (
<View>is comparable to a<div>,<Text>is the equivalent of a<p>tag)Instead of writing CSS, the styles are applied through JS objects with
property: valuepairs (with camelCase instead of hyphens)Units are dimensionless density-independent pixels (some properties like
widthandheightalso accept percentage values)
I've changed the styles a little to get a better idea of what's where (see screenshots below). The invaluable border: 1px solid red will be my best friend at the beginning, because although writing styles for mobile is almost like writing CSS for web, the details can be tricky sometimes.
The styles I've added (note that you have to define borderWidth and borderColor separately):
container: {
  flex: 1,
  backgroundColor: '#ace',
  alignItems: 'center',
  justifyContent: 'center',
  borderWidth: 4,
  borderColor: '#d00'
},
text: {
  fontSize: 30,
  borderWidth: 12,
  borderColor: '#070',
  backgroundColor: '#fff'
}
Comparing an HTML page with the same styles in Chrome's mobile preview with a screenshot from the actual device:
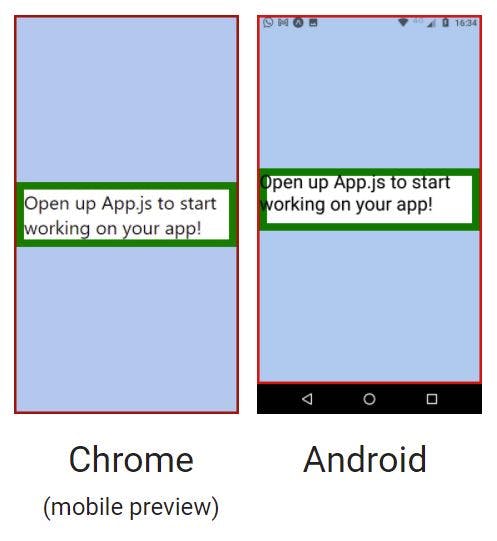
Chrome's preview doesn't simulate a status bar, there's also differences in how the content is rendered. For instance, the text is covering the thick green border on Android. To compensate, the <Text> element would need a padding of the same size.
📱 The Status Bar
The starter project contains a component <StatusBar /> to configure its appearance. It takes a number of optional props, backgroundColor being the most obvious one. The style prop defines the colour of text and icons (defaults to"auto", other values could be "light", "dark" or "inverted" ).
In the above screenshot from Android, you can see that the red border and the status bar overlap. This isn't always the desired behaviour, because any content that begins right at the top of the view would disappear behind the status bar. One way to avoid that is to set the translucent property to false (default is true):
<StatusBar backgroundColor="#ffff00" translucent={false} />

Safe Area Context
Instead of configuring the translucent prop of the status bar, you can also use a package react-native-safe-area-context and wrap the whole app with it. Its <SafeAreaView> component adds appropriate paddings at the edges, but it also comes with a hook that you can use to read those values yourself.
📱 Resources
Configuring the Expo Status Bar
📱 Thanks for reading!
If you find any errors or have additions, questions or just want to say hi, please leave a comment below, or get in touch via my website jsdisco.dev or Twitter.
Keep calm & code 👋