


Build a Guitar with Reactjs (1): Intro, setup and guitar body


JavaScript (and React) can do pretty awesome things, but did you know you can even build a whole guitar with it?
This article is the first in a series "How to build a Guitar with React". It is aimed mostly at beginners, but it's assumed that you already have some experience with React and create-react-app. Every step will be explained, though.
You can check out the final version (and play with it) in this codesandbox. The code with a branch for every article that I've planned so far can be found in this GitHub Repo.
There'll be no need for images or sound files, we'll use the full power 💪 of JavaScript and build it all from scratch.
🎸 Content of this part
- introduction and structure of the app
- the setup
- the guitar body UI
Components:
<Header /><Guitar /><GuitarBody />
🎸 Introduction
I'll use functional components throughout. Building an App with class based components seems to me like building a website layout with table elements, before flexbox and CSS grid saved everyone's lives. But I don't want to be too opinionated about it, it's just a personal preference.
This image should give you a first impression of the structure of the <Guitar /> component:
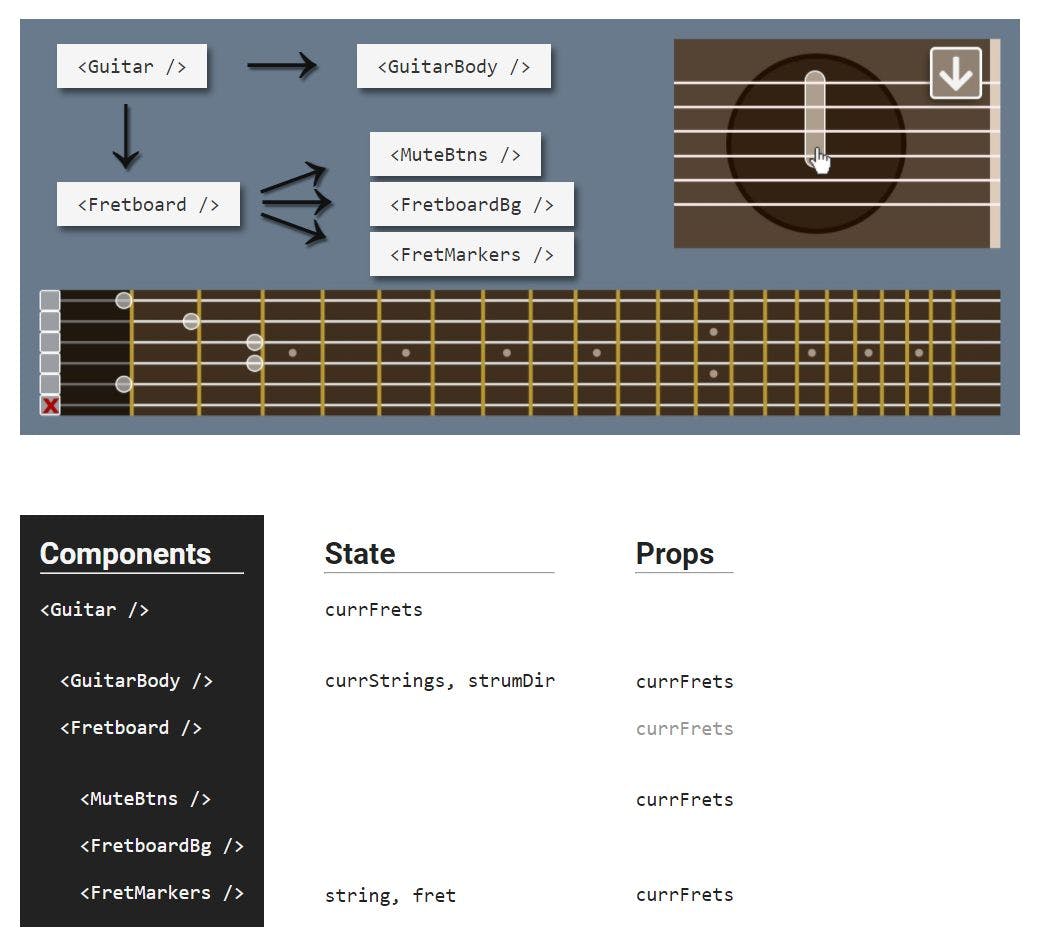
The two main parts are the <GuitarBody /> and the <Fretboard />, with the former being far less complex, so I'll start with that one in this part of the series.
If you look at (and try) the final guitar that I've linked above, you'll see there's two ways to play on it:
Playing on the fretboard
A click on the fretboard will play a single guitar note. There's also a circle/marker to indicate which string/fret I'm currently hovering, and a marker for each string. Playing a note will set the marker of that string to the played fret.
The positions (frets) of those six markers will be stored in the currFrets array, which is the only piece of state that the <Guitar /> component needs.
With the six buttons on the far left, it's also possible to mute a string.
Playing on the guitar body
As shown in the image above, you can hover over the body to select a group of strings. A click will then play all notes, depending on which frets are marked/muted. There's also a button to toggle the strum direction between "up" and "down".
Guitar Sounds
I'll use audiosynth by Keith Horwood for the sounds. It's a great tool to dynamically generate audio (wav) files, so there's no need for extra sound files for each guitar note. It'll only take very little modifications in the source code to make it work in React.
Disclaimer
I love writing code in React, but I am by no means an expert. If you follow this series and find parts that you think could be improved, I'd really appreciate your feedback.
Having all that out of the way, it's time to get our hands on the keyboard! 🙌
🎸 The setup
We'll initialise the project by running this command in the terminal:
npx create-react-app react-guitar
Moving to the project folder:
cd react-guitar
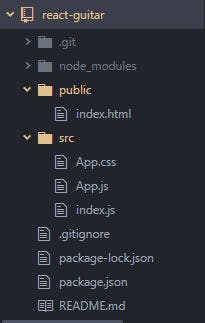
You can remove all unnecessary files if you like. Your folder structure should then look like this:
After cleaning up the files, the very first thing we'll need to do of course is adding a guitar favicon 😃 (read about how to use emojis as favicons on CSS-tricks)
So this is what we'll start with:
index.html:
<!DOCTYPE html>
<html lang="en">
<head>
<meta charset="utf-8" />
<meta name="viewport" content="width=device-width, initial-scale=1" />
<link rel="icon" href="data:image/svg+xml,<svg xmlns=%22http://www.w3.org/2000/svg%22 viewBox=%220 0 100 100%22><text y=%22.9em%22 font-size=%2290%22>🎸</text></svg>">
<title>React Guitar</title>
</head>
<body>
<noscript>You need to enable JavaScript to run this app.</noscript>
<div id="root"></div>
</body>
</html>
index.js:
import React from 'react';
import ReactDOM from 'react-dom';
import App from './App';

ReactDOM.render(
  <React.StrictMode>
    <App />
  </React.StrictMode>,
  document.getElementById('root')
);
App.js:
import React from 'react';
import './App.css';

function App() {
  return (
    <div className="App">

    </div>
  );
}

export default App;
Now it's time to start the server 🚀
npm start
(Code for the setup here 👉 on GitHub)
🎸 Adding the first components
I'll create a Components folder inside the src folder for all my components. We'll start with a <Header /> and a <Guitar /> component.
The Header component
The header could be used later to also hold some controls like a volume slider, but for now, it's just a stateless function to render a title:
Header.js
import React from 'react';

function Header(){
    return (
        <header><h1>React Guitar</h1></header>
    )
}

export default Header;
The Guitar component
The <Guitar /> will have two children - the <GuitarBody /> and the <Fretboard />. It will also keep track of the current frets.
currFrets will be an array holding 6 values for 6 guitar strings (from lowest to highest) to indicate where each string is fretted. A value of 1 means that the string is pressed down on the first fret, a value of 0 means that the string isn't fretted (which will be the initial state for all strings):
Guitar.js
import React, { useState } from 'react';

function Guitar(){
    const [currFrets, setCurrFrets] = useState([0,0,0,0,0,0]);

    return (
        <div className="guitar">

        </div>
    )
}

export default Guitar;
App.js:
import React from 'react';
import './App.css';
import Header from './Components/Header.js';
import Guitar from './Components/Guitar.js';

function App() {
  return (
    <div className="App">
        <Header />
        <Guitar />
    </div>
  );
}

export default App;
And because nobody likes to work with a white background and a black serif standard font (who made "serif" the default for web anyway, seriously why?), here's also some basic CSS to start with - feel free to customise:
* {
    margin:0;
    padding:0;
    box-sizing:border-box;
}
body {
  background:#192129;
}
.App {
    max-width:800px;
    padding:0 16px;
    margin:0 auto;
    font-family: 'Verdana', 'Helvetica', sans-serif;
    color:#f4f4f4;
}
header {
    padding:16px 0;
    font-size:20px;
    text-transform:uppercase;
}
.guitar {
    padding:16px;
    background:#687a8c;
}
🎸 The GuitarBody
So far, we've mostly written boilerplate and there's not much to see on the page yet, but we can finally start with some interactive elements now - with the first being the guitar body.
Creating another file GuitarBody.js in the Components folder, importing it into the <Guitar /> component and passing down the currFrets:
Guitar.js
import React from 'react';
import GuitarBody from './GuitarBody.js';
return (
    <div className="guitar">
        <GuitarBody currFrets={currFrets}/>
    </div>
)
Building the UI
I'll wrap the guitar body with a container-<div>, just to flex it over to the right. The body itself gets its guitar look by using the ::before and ::after pseudo elements for the hole and the bridge. It will contain another <div> for 6 evenly distributed strings, and also a button to toggle the strum direction.
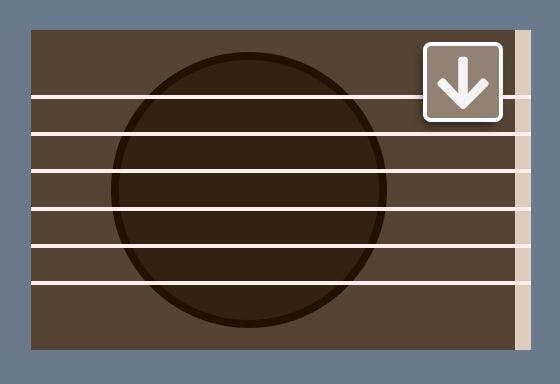
The 6 string-<div>s will again be styled with a ::before element to display a white string/line in each of them in their vertical center.
The button is actually a label for a controlled (and hidden) input of type checkbox. I'll use react-icons (<FaArrowDown /> and <FaArrowUp />) for the up and down arrows. To install them:
npm install react-icons --save
Alright, below is our (so far stateless) component:
GuitarBody.js
import React from 'react';
import { FaArrowDown, FaArrowUp } from 'react-icons/fa';

function GuitarBody({ currFrets }){

    return (
        <div className="guitar-body-container">
            <div className="guitar-body">
                <label
                    className="strum-dir-btn"
                    htmlFor="strum-dir">
                    <FaArrowDown />
                    <input
                        id="strum-dir"
                        type="checkbox"
                        name="strum-dir"
                    />
                </label>
                <div className="body-strings">
                    <div className="body-string" id="body-string-5"></div>
                    <div className="body-string" id="body-string-4"></div>
                    <div className="body-string" id="body-string-3"></div>
                    <div className="body-string" id="body-string-2"></div>
                    <div className="body-string" id="body-string-1"></div>
                    <div className="body-string" id="body-string-0"></div>
                </div>
            </div>
        </div>
    )
}

export default GuitarBody;
You could of course add the body-strings by mapping over the currFrets array, instead of typing them all out. I'm sometimes not sure what's the better choice - if it was a 12 string guitar, I'd probably use .map.
Now the CSS to make the guitar look like a guitar, and to hide the checkbox:
.guitar-body-container {
    margin:0 0 32px;
    display:flex;
    justify-content:flex-end;
}
.guitar-body {
    width:250px;
    height:160px;
    padding:24px 0;
    background:#543;
    position:relative;
}
.guitar-body::before {
    content:'';
    width:130px;
    height:130px;
    position:absolute;
    top:11px;
    left:40px;
    z-index:0;
    background:#321;
    border:4px solid #210;
    border-radius:50%;
}
.guitar-body::after {
    content:'';
    width:8px;
    height:100%;
    position:absolute;
    top:0;
    right:0;
    background:#dcb;
}

.body-strings {
    height:100%;
    position:relative;
    display:flex;
    flex-direction:column;
}
.body-string {
    flex-grow:1;
    position:relative;
    z-index:10;
}
.body-string::before {
    content:'';
    width:100%;
    height:2px;
    position:absolute;
    top:50%;
    left:0;
    margin-top:-1px;
    background:#fee;
}

.strum-dir-btn {
    width:40px;
    height:40px;
    text-align:center;
    line-height:44px;
    position:absolute;
    top:6px;
    right:14px;
    z-index:20;
    font-size:30px;
    background:#908172;
    box-shadow:-2px 3px 6px -2px rgba(0,0,0,0.6);
    border:2px solid white;
    border-radius:4px;
    cursor:pointer;
}
.strum-dir-btn:hover {
    background:#ab9b8c;
}

.strum-dir-btn input {
    width:0;
    height:0;
    position:absolute;
    opacity:0;
}
Adding state: Strum direction
The guitar body will keep the current strum direction in its own state, toggled by the checkbox input. This will have influence on which strings are played. Strumming down means that you start at a low string and then strum all the way down to the highest (sometimes you might not strum all the way up or down from the start string, but I don't want to overcomplicate things. Also, the fretboard will have the option to mute strings). For example, an A-major or A-minor chord starts at the second lowest string, so you only play five strings.
On a real guitar, the strum direction would also make an audible difference, especially when strumming slowly, but on our guitar, all strings will be played at once without delay.
In order to determine which strings should be played, I'll need to
- look at the current strum direction
- look at which string is currently hovered
If the strum direction is "down", all strings from the hovered string upwards will be played. If the strum direction is "up", all strings from the hovered string downwards will be played.
I hope this wasn't too confusing...
Are you still with me? Then let's add everything we need:
GuitarBody.js
- import
{useState}:
import React, { useState } from 'react';
- add
strumDirandsetStrumDiras state, and initialise it with "down":
const [strumDir, setStrumDir] = useState('down');
- add a function to update
strumDir:
function updateStrumDir(e){
    setStrumDir(() => e.target.value === 'down' ? 'up' : 'down');
}
- use state to control the
valueattribute of theinput - add an
onChangeevent listener to theinputto update state - conditionally render either an upwards or a downwards arrow inside the label
<label
    className="strum-dir-btn"
    htmlFor="strum-dir"
>
    {strumDir === 'down' ? <FaArrowDown /> : <FaArrowUp />}
    <input
        id="strum-dir"
        type="checkbox"
        name="strum-dir"
        value={strumDir}
        onChange={updateStrumDir}
    />
</label>
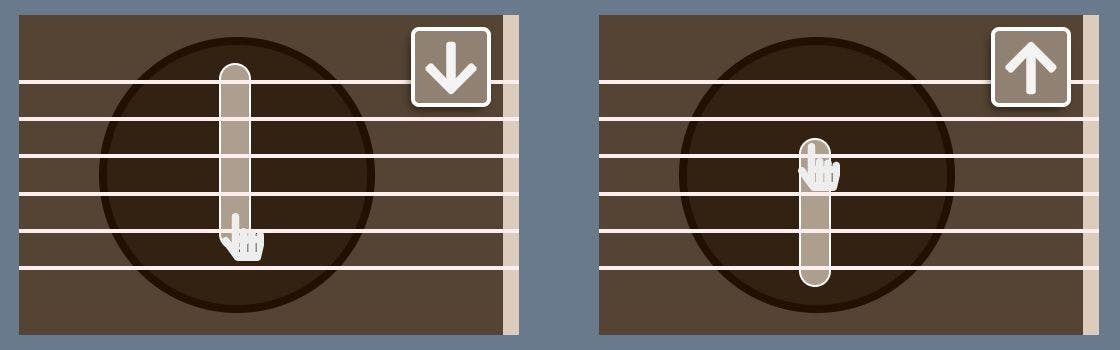
And we're done with this part. The only thing missing is the marker that indicates which strings are active on hover, so we'll add one more state variable and use it to determine how the marker should render:
Adding state: Current strings
I'll store the indices of the currently active strings in an array, so it's empty to begin with. If the strum direction is "down" and I hover over the lowest string (with index 0), all strings will be active. If the strum direction is "up", only the lowest string is active.
The index of the hovered string can be obtained by reading its id attribute, and a small function will then give us the array of the active string indices.
I'll also use the length of the currStrings array to determine whether the strings marker should be visible or not, which will save me the effort of introducing another variable that's usually a clumsily named Boolean like isStringsMarkerVisible.
Alright, here we go:
GuitarBody.js
- adding state and initialising it with an empty array:
const [currStrings, setCurrStrings] = useState([]);
- a function to get the currently active strings, depending on the start string and the strum direction:
function getCurrStrings(string, dir){
    let strings = [0,1,2,3,4,5];
    return strumDir === 'down' ? strings.slice(string) : strings.slice(0, string+1);
}
- two mouse event listeners on the
guitar-bodyto either show or hide the strings marker by updating thecurrStringsarray:
<div
    className="guitar-body"
    onMouseMove={showStringsMarker}
    onMouseLeave={hideStringsMarker}
>
- the two mouse event callback functions:
function showStringsMarker(e){
    if (e.target.className === 'body-string'){
        const startString = +e.target.id.replace('body-string-', '');
        setCurrStrings(getCurrStrings(startString, strumDir))
    }
}

function hideStringsMarker(){
    setCurrStrings([])
}
Right now, there's no visual indication if our code is working, but we could console.log(currStrings) and see that they get updated when we hover over the strings. So now, we can add our marker:
Adding the strings marker
I'm not sure if there's better ways to do this, but my plan is to add another marker-<div> to the body-strings, set its position to absolute and render it with a style object for its height, top and bottom values, depending on the currStrings state. I'll also use a short-circuited conditional to determine if it should be rendered or not.
- first some default CSS:
#strings-marker {
    position:absolute;
    top:0;
    left:40%;
    width:16px;
    background:rgba(255,240,225,0.6);
    border:1px solid #fff;
    border-radius:100px;
    pointer-events:none;
}
- adding it to the
body-strings:
<div className="body-strings">
    <div className="body-string" id="body-string-5"></div>
    {/*...*/}
    <div className="body-string" id="body-string-1"></div>
    <div className="body-string" id="body-string-0"></div>

    {currStrings.length > 0 &&
    <div id="strings-marker" style={stringsMarkerStyle}></div>
    }

</div>
- finally, the styles object:
const stringsMarkerStyle = {
    height:`${100/6 * currStrings.length}%`,
    top:`${strumDir === 'down' ? '0' : 'unset'}`,
    bottom:`${strumDir === 'down' ? 'unset' : '0'}`
}
Strumming down means that the marker will always end at the highest string, so it'll have its top property set to 0 and the bottom value will be 'unset' (the other way around for strumming up). The height can be retrieved from the length of the currStrings array.
That's it for part 1, the <GuitarBody > component is almost finished. We'll come back to it once more in the next part, because one very important part of functionality is obviously missing - sound! 🔊
🎸 Outlook for the next part
In part 2, we'll ...
- add all files and functions to dynamically create the
.wavfiles with AudioSynth - add the functionality to play open strings on the guitar body
(Code for this part here 👉 on Github)
🎸 Thank you for reading!
I hope you enjoyed coding along so far. If you found any mistakes, if something isn't working as expected, if you see room for improvement anywhere, or if you just happen to like this post, I'd appreciate your feedback in the comment section below. You can also @ me on Twitter. If you'd like to read more like this, I invite you to subsribe to my newsletter. Until next time 👋