


If you've written a React application with Node/Express backend in the past, you're going to love Next.js. You get a lot of things out of the box that you had to do manually before (like creating routes and API endpoints), but it's not just about the fabulous developer experience. Your pages will be much faster and more SEO-friendly, because instead of throwing a huge package of JavaScript code at the client's browser to fill the page with content, you deliver them the pre-rendered HTML. The server does all the heavy lifting.
Next.js is also incredibely smart when it comes to dealing with dynamically generated routes and content that needs to be fetched from external resources. As an example - if a news website gets 10k hits each second, that would be 10k requests to a database in a traditional MERN application. With Next.js, only the first hit causes traffic between backend and database. The resulting page is built and saved, and can be immediately served to all subsequent requests. To make sure that the page is always up-to-date and delivers the latest news, you can configure a revalidation time interval after which a new version of the page is created. Again, it's only one user that will get a little delay - everyone that makes a request after them within a certain time interval will benefit from the pre-built page.
The three main functions that you'll use for writing the server code are:
getServerSidePropsgetStaticProps(plus additionallygetStaticPathsif required)
The first one is much closer to a traditional MERN app, and it doesn't give you the performance boost as described above. In many (most) cases, you'll use the second option instead, but nevertheless I'll give a brief overview over what you can do with it, and some general introductions into how Next.js works.
✏ getServerSideProps
A React component in Next.js looks just like a normal React component, except there's a second function getServerSideProps. Whenever someone hits the page, that function runs first, and it runs on the server. In the example below, it's returning some hard-coded data for simplicity, but usually you'd make a request to an API to fetch some data.
With getServerSideProps, the page is rendered at run-time at every request (if you only wanted to serve a static page where the content never changes, you'd pick a different strategy where you pre-render the page at build time).
index.js
import Article from '../components/Article';

export default function Home({ articles }) {

  console.log("I log both to the Node terminal and the client's browser");

  return (
    <div>
      <h1>News Articles:</h1>
      {articles.map((article) => <Article key={article.id} article={article} />)}
    </div>
  );
}

export const getServerSideProps = () => {

  console.log("I only log to the Node terminal");

  const articles = [ { id: 1, title: 'First article' }, { id: 2, title: 'Second article' }];

  return { props: { articles } };
};
Once the function has returned the articles, Next.js will throw those as props into the <Home /> component, render the page on the server, and deliver the final HTML + JS to the client.
If you pay close attention to the above code, there's a tiny difference between client-side-rendered and server-side-rendered component code. In a regular React app, you'd have to make sure that articles isn't null or undefined when you try to map over it, with something like:
{ articles && articles.map((article) => <Article key={article.id} article={article} />)}
With Next.js, the Home component won't be rendered unless getServerSideProps has returned the data. This also means that if you're fetching large amounts of data, the user will see that little spinner in the browser tab, while the request is pending. To simulate the behaviour, add some artificial delay to the function:
export const getServerSideProps = () => {

  const articles = [ { id: 1, title: 'First article' }, { id: 2, title: 'Second article' }];

  let i=0;
  while (i < 1E9) { i++ }

  return { props: { articles } };
};
✏ The context object
getServerSideProps has access to a lot of familiar sounding properties via the context object. To see what those are:
export const getServerSideProps = ( context ) => {

  console.log(Object.keys(context));

  const articles = [ { id: 1, title: 'First article' }, { id: 2, title: 'Second article' }];
  return { props: { articles } };
};

// logs
[
  'req',
  'res',
  'query',
  'resolvedUrl',
  'locales',
  'locale',
  'defaultLocale'
]
(if you hit a dynamic route, you'll also have a params property, more about that below)
The context object gives you pretty much full control, and the code you write is very similar to what you'd write in a Node/Express backend - except that here, you're returning some data to be rendered on the server in a React component.
You don't have to, though. You can do whatever you like:
Nonsensical usage of Next.js
export const getServerSideProps = ({ res }) => {

  res.statusCode = 418;
  res.setHeader('Content-Type': 'text/html');
  res.write(JSON.stringify({ message: "This is no React App" }));
  res.end();

  // this will never be rendered, but leaving out a return statement
  // would throw an error
  const data = null;
  return {
    props: { data }
  }
}
✏ Static and Dynamic Routes
Routing is very intuitive with Next.js. Every file inside the /pages folder corresponds to a route. For a route to a page "About", create a file about.js. For nested routes, create subfolders with the corresponding name.
For a dynamic route, for example /articles/[id], you'd create a file named [id].js inside a folder /articles.
That file would run getServerSideProps to retrieve the article's data from your own app's API endpoint and render a React component as template for all articles:
export default function ArticleTemplate({ article }) {

  return (
    <>
      <h1>{article.title}</h1>
      <p>{article.body}</p>
    </>
  )
}

export const getServerSideProps = async ({ params }) => {

  const response = await fetch(`https://my-app.com/api/${params.id}`);
  const articles = await response.json();

  return { props: { articles } };
}
If your user hits a route https://my-app.com/articles/12345, your backend would fetch the article with id=12345.
✏ query, params and resolvedUrl
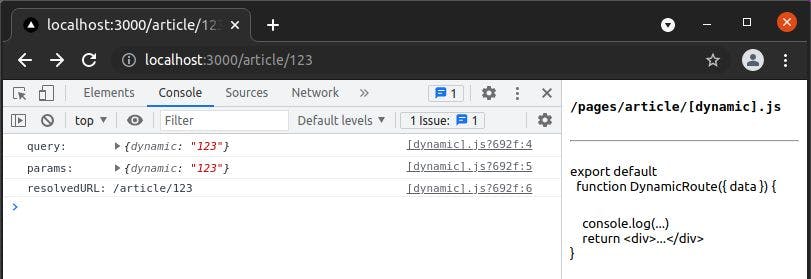
For the following examples, I've created a file [dynamic].js in a folder /article. My getServerSideProps function only returns the query, params and resolvedUrl it receives from the context object back to the component, where I'm logging them out to the console.
While this is a little nonsensical (normally you'd use those values inside getServerSideProps to make a request to fetch a particular article), it helps to visualise what's happening.
/article/[dynamic].js js export const getServerSideProps = async ({ query, params, resolvedUrl }) => { return { props: { data: { query, params, resolvedUrl } }, }; };
When you hit a route /article/123, both the query and the params object will have a property dynamic, corresponding to the filename. You can either use those objects to extract the values you need, or perform your own regex on the resolvedUrl string:
If you attach a query string, you get a second property on the query object:
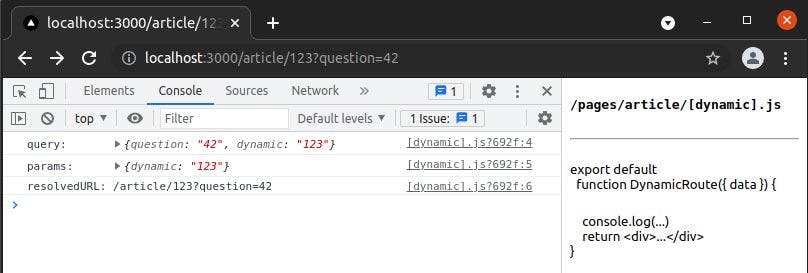
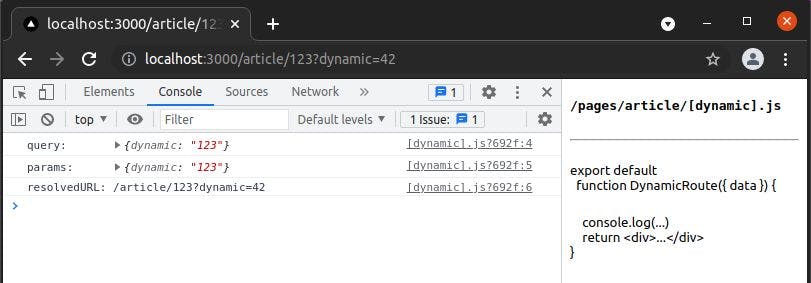
One little quirk appears when you attach a query string with the same key as the route's name (as noted in this in-debth Next.js course, which I highly encourage everyone to watch). The query disappears from the query object, because obviously it cannot have two properties with the same name. So this would be a good use case for extracting the values yourself from resolvedUrl, in the unlikely case that you run into such a situation.
✏ Creating an API endpoint
This is as simple as creating a folder called api (it has to be exactly that name) and within it, an index.js file. Similar to the pages folder, all routes inside map directly to the folder structure.
The index.js exports a handler function that returns whatever you like - for example a request to an external API:
/api/index.js
export default async function handler(req, res) {
  const data = await fetch(url);
  res.status(200).json(data);
}
The difference between the pages and the api folder is that the latter contains only server code. It won't be included in the client bundle.
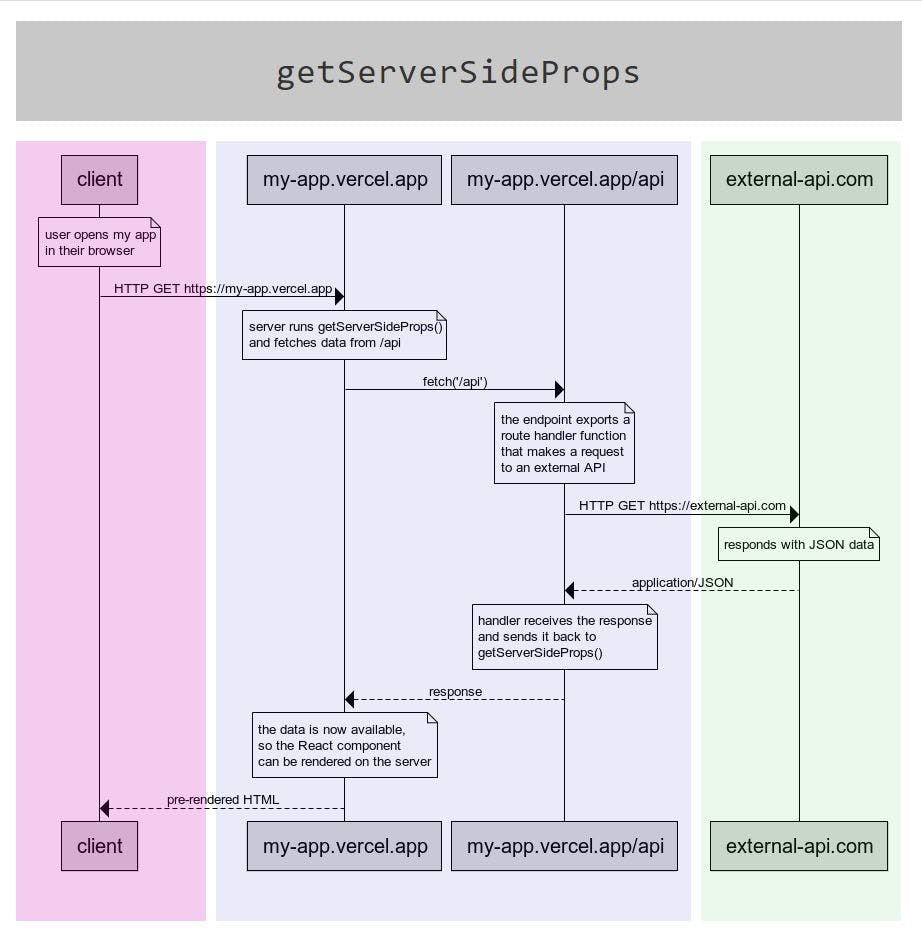
In a realistic setup, the request and data flow would look something like this:
✏ Summing it up
with
getServerSideProps, your pages will be rendered at run-time for every request, comparable to a page built with PHP that compiles a HTML template on the serverthis ensures that the data is always up-to-date (although there are better methods to achieve a very similar result, see next post), but comes at a cost for performance
✏ Resources
Advanced Next.js Course by codedamn
✏ Next
getStaticProps and getStaticPaths
✏ Thanks for reading!
I do my best to thoroughly research the things I learn, but if you find any errors or have additions, please leave a comment below, or @ me on Twitter. If you liked this post, I invite you to subsribe to my newsletter. Until next time 👋
✏ Previous Posts
You can find an overview of all previous posts with tags and tag search here: