🆙 Update
I did a lot of research concerning secure authorisation in the last couple of days and wrote about my findings on Day 42. I've updated the parts of this blog that previously contained insecure code examples, and added hints where necessary.
✏ How to add a Login Function to your App (3/4)
In the previous posts, I had set up the server and database connection, and created three routes:
POST request to
/api/users/loginto log inGET request to
/api/users/profileto get the user's profilePOST request to
/api/users/registerto register a user
The first thing I'd like to do though is a refactor of the backend code. Right now, it's all in one file server.js, and although it's only three routes so far, this isn't very clean (or easily scalable).
✏ Introducing Express Router
Express comes with a built-in Router, which we'll use now to clean up the server file.
First, create a folder routes and within it, a file userRoutes.js. Import express, and create and export a new Router object:
const express = require('express');
const router = express.Router();

/* routes go here */

module.exports = router;
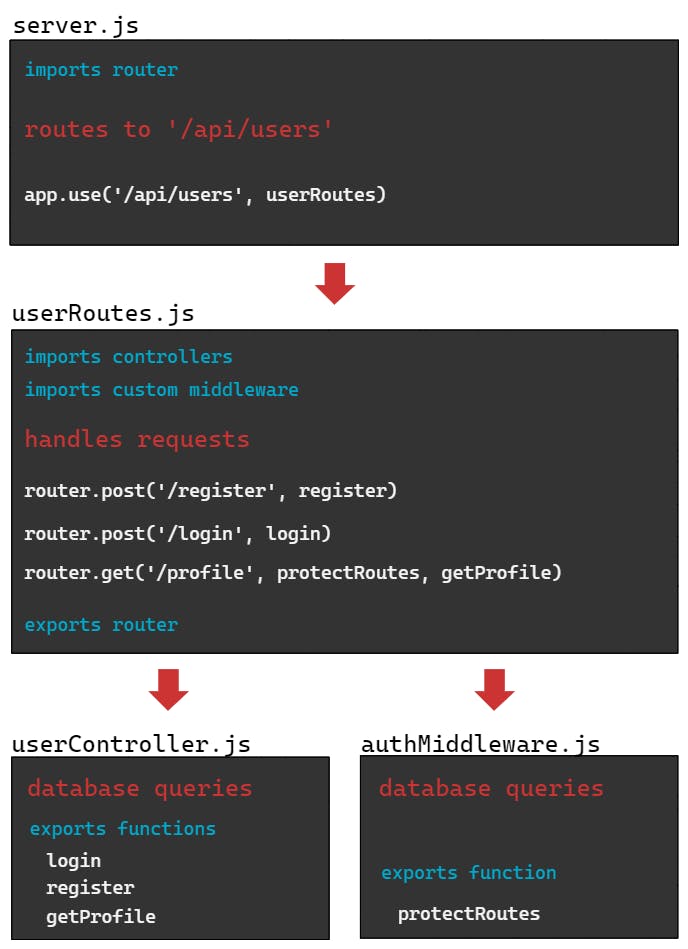
We can use this Router object to mount our routes for specific parts of the app. The current routes all go to endpoints /api/users/register, /api/users/login and /api/users/profile. It makes sense to bundle/scope those, and the only thing that the server.js needs is the imported Router object, to send all requests to their endpoints.
I could put all the code to handle the different requests into userRoutes.js, but that would be as messy as putting it all into the server.js, and considering "separation of concerns", it wouldn't make much sense to let the router code perform database operations.
These things will go into a third file userController.js (and yes, that one will be a bit messy, but stuff requires code and it has to go somewhere).
An attempt to illustrate the flow:

This allows to write very clean and concise code for the router - we have the different requests, and a couple of callbacks and optional middleware for each:
userRoutes.js
const express = require('express');
const router = express.Router();
const protectRoutes = require('../middleware/authMiddleware.js');

router.post('/register', register);
router.post('/login', login);
router.get('/profile', protectRoutes, getProfile)

module.exports = router;
(Note that the routes are now relative to the api/users endpoint.)
The server imports the router and uses it like any other middleware:
server.js
js const userRoutes = require('./routes/userRoutes.js');

app.use('/api/users', userRoutes);
This obviously won't work yet, because we've neither imported or defined the callbacks for the router anywhere, the only thing that's already in place is the protectRoutes middleware.
So let's create the file. I'll call it userController.js, because that's what it essentially is (see explanation below), and put it in a folder controllers. It's really just cutting/pasting all the functions we've already created earlier, so I'll just throw them in and post the whole code:
userController.js
const asyncHandler = require('express-async-handler');
const bcrypt = require('bcryptjs');
const { generateAccessToken } = require('../utils/generateToken.js');
const User = require('../models/usermodel.js');

const login = asyncHandler(async (req, res) => {
    const { email, password } = req.body;
    const user = await User.findOne({ email });

    if (user && (await bcrypt.compare(password, user.password))) {
        res.json({
            _id: user._id,
            token: generateAccessToken(user._id)
        });
    } else {
        res.status(401);
        throw new Error('invalid email or password');
    }
});

const register = asyncHandler(async (req, res) => {
    const { email, password } = req.body;
    const user = await User.findOne({ email });

    if (user) {
        res.status(400);
        throw new Error('this email is already registered');
    }

    const newUser = await User.create({
        email,
        password: bcrypt.hashSync(password)
    });

    if (newUser) {
        res.status(201);
        res.json({
            _id: newUser._id,
            token: generateAccessToken(newUser._id)
        });
    } else {
        res.status(400);
        throw new Error('could not create user account');
    }
});

const getProfile = asyncHandler(async (req, res) => {
    const user = await User.findById(req.user._id);

    if (user) {
        res.json({
            _id: user._id,
            email: user.email
        });
    } else {
        res.status(400);
        throw new Error('user not found');
    }
});

module.exports = { login, register, getProfile };
This controller file is now responsible for what happens for each request. The router is only responsible for calling the right controller for each route.
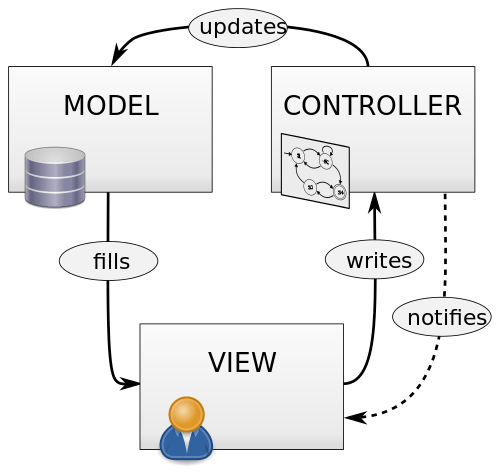
This pattern also has a name, which you've probably already heard before:
✏ MVC - Model, View, Controller
The View is what the user sees and interacts with. What they see depends on the request. The router passes each request to a Controller, a function that is interacting with the Model. It can perform CRUD operations on it, which then influences what gets rendered on the screen.

Splitting the code up like this makes it modular, it's easy to maintain and to reason with, because the responsibilities are separated into their own space. But back to our code:
✏ Updating the Router and Server files
Since we have the controllers now, the router can import them:
userRoutes.js
const express = require('express');
const router = express.Router();
const protectRoutes = require('../middleware/authMiddleware.js');
const { login, register, getProfile } = require('../controllers/userController.js');

router.post('/register', register);
router.post('/login', login);
router.get('/profile', protectRoutes, getProfile)

module.exports = router;
We've already imported the routes in the server file, but I'm posting the whole code again with updated imports (it requires much less stuff now):
server.js
const dotenv = require('dotenv');
dotenv.config();

const express = require('express');
const cors = require('cors');
const connect = require('./db/connect.js');
const { notFoundHandler, errorHandler } = require('./middleware/errorMiddleware.js');
const userRoutes = require('./routes/userRoutes.js');

connect();

const app = express();

app.use(express.json());
app.use(express.urlencoded({ extended: true }));
app.use(cors());

app.get('/ping', (req, res) => res.send('API is running'));

app.use('/api/users', userRoutes);

app.use(notFoundHandler);
app.use(errorHandler);

const PORT = process.env.PORT || 5000;

app.listen(PORT, () =>
    console.log(
        `server running in ${process.env.NODE_ENV} mode on port ${PORT}`
    )
);
To add more routes, you'll need very little updates in the server.js and userRoutes.js files now, the only thing that gets blown up a little is the controller file, but all it contains is a list of functions that handle the request, response, and database queries for each route. If something goes wrong, you can easily identify the function that didn't do its job.
I'm going to add one more route, to let a user update their profile:
✏ Adding a route to edit a user profile
Since we're not creating a new resource, but update an existing one, this will be a PUT request. The endpoint is /api/users/profile.
The server file doesn't need any modification at all, and the router file only needs to import a new controller, and a new route. Like the route to get a profile, it's also protected by our middleware:
userRoutes.js
// import another controller
const { login, register, getProfile, updateProfile } = require('../controllers/userController.js');

// add a route
router.put('/profile', protectRoutes, updateProfile);
We already have a route to that endpoint (the GET request for the profile). Whenever you have multiple requests to the same endpoint, you can rewrite that by chaining HTTP verbs to router.route like this:
router
    .route('/profile')
    .get(protectRoutes, getProfile)
    .put(protectRoutes, updateProfile);
The actual work is writing the controller. The first middleware, protectRoutes, will check the Bearer Token, extract the user's database id from the payload and add the user object to the request object.
It gets passed on to updateProfile, which can then get the id from req.user._id, along with the property that the user wants to update from the request body. In my case, this can either be their email or their password. The steps required:
get the user from the database
if the user exists, update the property that the user wanted to edit
save the updated user object to the database
respond with the updated user object and a new token
if user doesn't exist, throw error
const updateProfile = asyncHandler(async (req, res) => {
    const user = await User.findById(req.user._id);

    if (user) {
        user.email = req.body.email || user.email;
        if (req.body.password) {
            user.password = bcrypt.hashSync(req.body.password);
        }

        const updatedUser = await user.save();

        res.json({
            _id: updatedUser._id,
            token: generateToken(user._id)
        });
    } else {
        res.status(400);
        throw new Error('user not found');
    }
});
Testing this with my new favourite tool Postman - looks like everything's working 🎉
Users can register, login, and update their profile. They can't delete their profile yet, but that's an uncomplicated one, so maybe I'll include it later. You might wonder though if something else is still missing - I did wonder for sure.
✏ Why don't we need a route to Log Out?
This was surprising for me at first, but thinking about it, it makes sense. The server doesn't need to know that you log out from an account. You can implement it of course, and in a real application, it's likely that you would. But it's not a requirement.
"Logging in" to an account means that your browser receives some kind of authorisation item. In this case, it's a JSON Web Token, but it could also be a cookie. When you log out, this item is removed from the browser, and that happens on the frontend. The backend has nothing to do with it.
For a server, you're logged out by default. If you send a request that includes valid authorisation, you're logged in. Logging in or out doesn't toggle a switch on the server, the only difference is sending a request with or without authorisation.
So, now that all the routes are ready, it's time to build a simple frontend, and connect it to the backend.
🆙 UPDATE
With the current implementation, a route to /logout isn't required, but in the next post, we'll see that in order to build an application that isn't vulnerable to attacks, having a /logout route is mandatory.
✏ Resources
Node.js Crash Course - Express Router & MVC
✏ Recap
This post covered:
how to use Express Router
separating backend code with Model-View-Controller pattern
✏ Thanks for reading!
I do my best to thoroughly research the things I learn, but if you find any errors or have additions, please leave a comment below, or @ me on Twitter. If you liked this post, I invite you to subscribe to my newsletter. Until next time 👋
✏ Previous Posts
You can find an overview of all previous posts with tags and tag search here:

