


🆙 Update:
I did a lot of research concerning secure authorisation in the last couple of days and wrote about my findings on Day 42. I've updated the parts of this blog that previously contained insecure code examples, and added hints where necessary.
✏ How to add a Login Function to your App (2/4)
In part 1, we've set up the route to /api/users/login with the authentication logic working as it should. The next step is to send a JSON Web Token to authorise the user to access protected routes like their user profile.
First, a quick look at the current dependencies:
package.json
    "dependencies": {
        "bcryptjs": "^2.4.3",
        "cors": "^2.8.5",
        "dotenv": "^8.2.0",
        "express": "^4.17.1",
        "mongoose": "^5.11.15"
    },
    "devDependencies": {
        "nodemon": "^2.0.7"
    }
And the current files and folders:
backend
|
|- db
|  |-connect.js
|  |-seedDB.js
|
|- middleware
|  |-errorMiddleware.js
|
|- models
|  |-usermodel.js
|
|- .env
|- package-lock.json
|- package.json
|- server.js
Express Async Handler
But before continuing with user authentication, I'd like to bring in another package (express-async-handler) and do a quick refactor of the login route. It's a mini package to wrap async functions, to avoid unhandled promise rejection warnings when an error is thrown in an async middleware, and allows to simplify the current code for the route quite a bit:
npm i express-async-handler
server.js ```js const asyncHandler = require('express-async-handler');
app.post('/api/users/login', asyncHandler(async (req, res) => {
const { email, password } = req.body; const user = await User.findOne({ email });
if (user && (await bcrypt.compare(password, user.password))) { res.json({ _id: user._id, token: null }); } else { res.status(401); throw new Error('invalid email or password'); } }) ); ```
This looks a lot more readable than before. But the token we send back is still null, so let's continue:
✏ Generating the Token
To actually create the token, you need to install a library first, for example the npm jsonwebtoken package. I'll put the code for that into a separate file in a utils folder:
utils/generateToken.js
const jwt = require('jsonwebtoken');

const generateAccessToken = id => {
    return jwt.sign(
        { id },
        process.env.JWT_SECRET_ACCESS,
        { expiresIn: 30 }
    );
};

module.exports = { generateAccessToken };
The .sign method takes two mandatory arguments:
the payload (in this case the database id)
the token secret
Optionally, you can provide an object with options to chose a different algorithm than the default HS256, or to set an expiration date, which is 30 seconds in this case (I'll explain later why I'm setting it to expire almost immediately). If you want to generate the token asynchronously, you can also provide a callback.
Updating the server code to send the token back to the client:
server.js
const { generateAccessToken } = require('./utils/generateToken.js');

            /* ... */

            res.json({
                _id: user._id,
                token: generateAccessToken(user._id) // add the token
            });
If you check the server response with Postman again now, you'll get the encoded token string. To decode, you can paste the string onto the JWT site, and you'll see the payload (user id and timestamps). So again - whoever gets access to the token string can see what we've sent, nothing in that payload is a secret. We can only be sure that this token originally came from us, by checking the signature, and that the payload wasn't modified.
✏ Setting up a protected route
Now that the user is authenticated, the token can be used to authorise them to access protected routes, like their profile page.
Such a route would, for example, go to /api/users/profile, and it would be the same for everyone who makes a request to that route, but the response depends on the request.
If a non-registered user tries to access the page, or a user that hasn't successfully logged in, they'd get a 401 Unauthorized response from the server. Only a request that comes with a valid token would show the content of the profile page. Which profile page depends on the user's id that we embedded within the token's payload.
To perform all these steps, I'll create another custom middleware function protectRoutes, which will be used in the route to the user's profile.
For now, while I'm still working on the route, I'll let the server respond with a success message:
server.js
app.get('/api/users/profile', protectRoutes, (req, res) => {
    res.send('success')
});
✏ Custom Authorisation Middleware
In the middleware folder, I'll create another file authMiddleware.js, where I bring in the jsonwebtoken package (to decode the token) and the User model (to get the user's data, if the token is valid).
The file will then export the protectRoutes function. To begin, I'll only log to the console the property req.headers.authorization of the request object. In order to pass the request on to the next middleware, next() needs to be called at the end:
const jwt = require('jsonwebtoken');
const User = require('../models/usermodel.js');
const asyncHandler = require('express-async-handler');

const protectRoutes = asyncHandler(async (req, res, next) => {

    console.log(req.headers.authorization);
    next();
});

module.exports = protectRoutes;
Let's head back to Postman and test the route. We get our default success response, as expected. The console logs undefined, since we've not sent a token.
Now we'll retry the request with a token in the headers. After a valid POST request to /api/users/login, we had received the encoded token string in the response. To use it in the GET request to /api/users/profile, copy that string and click on the "Auth" tab in Postman, right below the request route. Select "Bearer Token" from the dropdown and paste the encoded string into the field labelled "Token" to the right (calling it "Bearer" is a convention, it basically means "this request comes from the bearer of a token, if it's valid, give them access to certain routes").
Making the POST request with the token, we again get the default success response, but the console logs Bearer <encodedstring> instead of undefined. So, in our middleware function, we'll first check if a token is sent with the request header, and if it's a Bearer token.
For a request without a token, we'll set the response header to 401 Unauthorized and throw an error.
Otherwise, we'll grab the token string by splitting away the 'Bearer' part in front of it, and decode+validate it by passing the token and our token secret to the .verify function of jsonwebtoken.
The decoded token contains the user's id (because that's what we gave the token as payload), so we can now get the user's data from the database. There's no need to fetch their password though, the user is already authenticated at this point, so I'm chaining .select('-password') to the query.
Finally, we'll add the user object to the request object, so we have access to it on all routes that are behind this extra layer of protectRoutes middleware:
note that this isn't the final protect middleware, there's another level of security involved, which will be added later
const protectRoutes = asyncHandler(async (req, res, next) => {

    // check if auth token is in headers, and if it's a Bearer token
    if (req.headers.authorization && req.headers.authorization.startsWith('Bearer')) {
        const accessToken = req.headers.authorization.split(' ')[1];

        try {
            // try to decode the token with our token secret
            const decodedAccess = jwt.verify(
                 accessToken, process.env.JWT_SECRET_ACCESS
            );
            if (decodedAccess) {
                // if token was valid, add the user object to the request object
                res.status(200);
                req.user = await User.findById(decodedAccess.id).select('-password');
            }

        } catch (err) {
            res.status(401);
            throw new Error('unauthorised, access token invalid');
        }
    } else {
        res.status(401);
        throw new Error('unauthorised, access token missing');
    }
});
Adjusting the server route
The user's data is now on the request object that gets passed on to the next middleware in the GET request. We could send that data back to the frontend now to display a profile page with all the data, or use their id to fetch them from the database again, but the latter seems to be more robust and accounts for possible errors.
The only data I'm storing in the database is the email, so I'll send that back, but in a real application, you'd obviously have much more data like name, profile image, a status like isPremiumUser and whatnot.
So, if a user is found, the server responds with their data, otherwise, throw a 400 Bad Request error:
server.js
app.get('/api/users/profile', protectRoutes, asyncHandler(async (req, res) => {

        const user = await User.findById(req.user._id);

        if (user) {
            res.json({
                _id: user._id,
                email: user.email
            });
        } else {
            res.status(400);
            throw new Error('user not found');
        }
    })
);
So that's it for the basics of user authorisation - any route behind the protectRoute middleware will only be visible for a user with a valid token, but as mentioned, this function still needs some work.
✏ User Registration
The hardest part is already done, the registration process is quite similar to the login process. It'll be handled by a different route, a POST request to the /api/users/register endpoint. These are the steps:
get the email and password that the user entered into the form fields from the request body
check if this email is already in the database
if yes, throw error, else, save the user to the database (remember to hash the password)
if saving was successful, respond with
201 Createdand a token, else, throw error
Because there's async database operations involved, we'll use the asyncHandler again:
app.post('/api/users', asyncHandler(async (req, res) => {

        // get the form data and check for email
        const { email, password } = req.body;
        const user = await User.findOne({ email });

        // terminate request if email already exists
        if (user) {
            res.status(400);
            throw new Error('this email is already registered');
        }

        // instantiate + save a new user with hashed password
        const newUser = await User.create({
            email,
            password: bcrypt.hashSync(password)
        });

        // on success, send back id and token
        if (newUser) {
            res.status(201);
            res.json({
                _id: newUser._id,
                token: generateAccessToken(newUser._id)
            });
        } else {
            res.status(400);
            throw new Error('could not create user account');
        }
    })
);
And that's it for the registration part! Sending a (valid) POST request with Postman will now add new users to the database.
✏ Advanced testing with Postman
To wrap this blog up, I'll spend a few words on how to configure Postman to create a more sophisticated environment for testing routes.
Create a Workspace
From the menu on the upper left, create a new Workspace. If you're not working on a team (select "personal" in the "visibility" dropdown), you only need to give it a name.
Create a Collection
Click on "create a collection". You can rename it and add a description, or leave it as it is. All routes you create and save will be put in this collection folder (or a different one, you can have multiple collections). For a big ecommerce project, you'd probably have a collection for all the user routes, one for the product routes, etc.
Create an Environment
This is a very convenient feature to mimic .env variables and other constants like the server address. From your workspace, click on "create an environment" and add your variables, for example the URL you're using. Also, tell Postman that you're currently working with that environmnent by selecting it from the dropdown on the upper right:
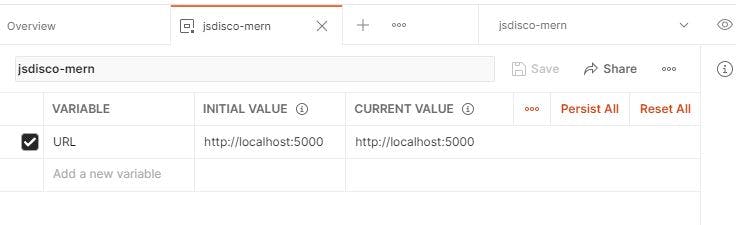
Now you can use this variable in your requests.
Add a Request
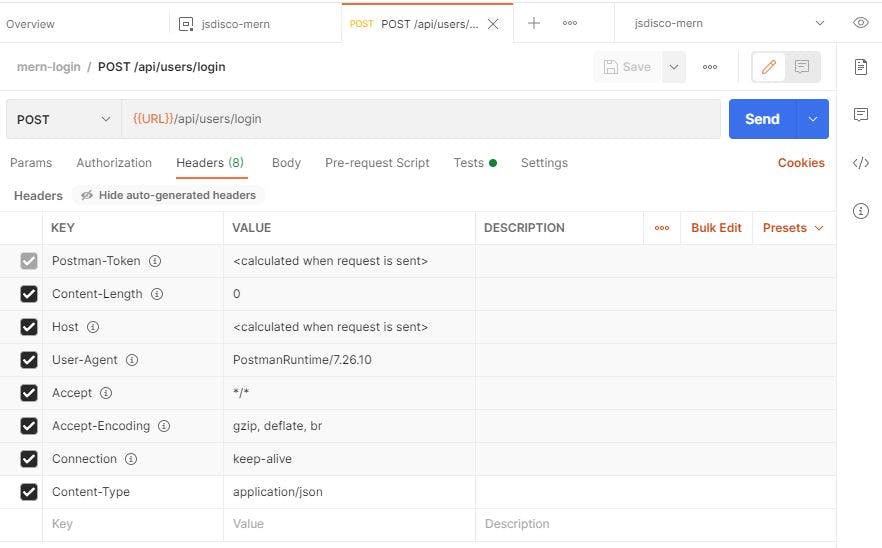
From the collection dropdown, add a new request. I'll start with the first route I had set up, which was a POST request to the /api/users/login endpoint:
it makes sense to give the request a title, so you can easily find/identify it later in your collection
from the dropdown, select the HTTP verb for this request (POST)
enter the URL (to use the variable we already created, put it in double curly braces)
as we're sending a JSON object, set the Content-Type in the Headers tab to "application/json" by adding a new key/value pair
We have to send some data with the request, so click on the next tab "Body", choose "raw" from the dropdown, and enter your JSON object:
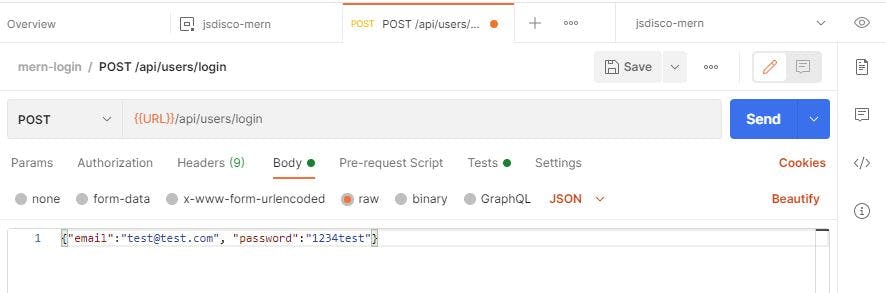
Now you can save that request for future tests. If you send it (and entered a valid email/password), you should get back the database id and the token string in the response.
Saving the Token
The next route we had set up was a GET request to the user's profile page, and we had to copy/paste the token string into the request headers to test that route. To make our life easier, we'll now save the token to the environment variables.
To do so, click on the "Test" tab of the POST request, and enter a small script to save the token from the response in an environment variable called "TOKEN":
pm.environment.set("TOKEN", pm.response.json().token)
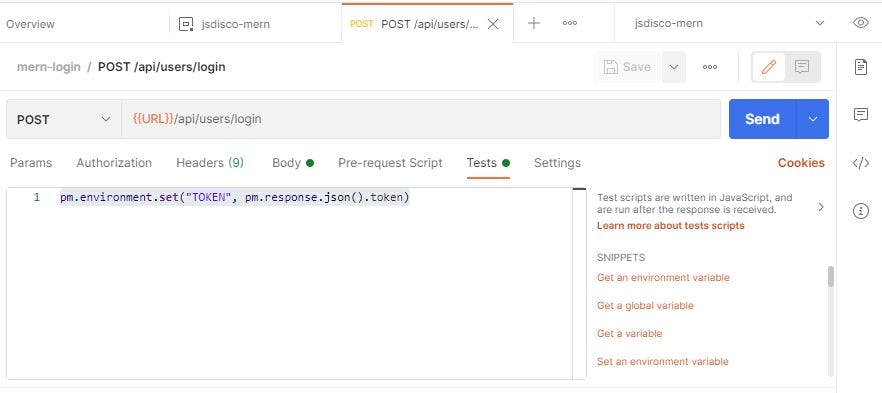
If you make the request again now, and click on the eye-icon in the upper right, you should see that the token was saved to the environment.
Using the Token in a GET request
Now add another request to your collection: a GET request to the /api/users/profile page. Instead of manually adding the token, you can now select "Bearer token" in the "Auth" tab, and enter the variable in double curly braces again:
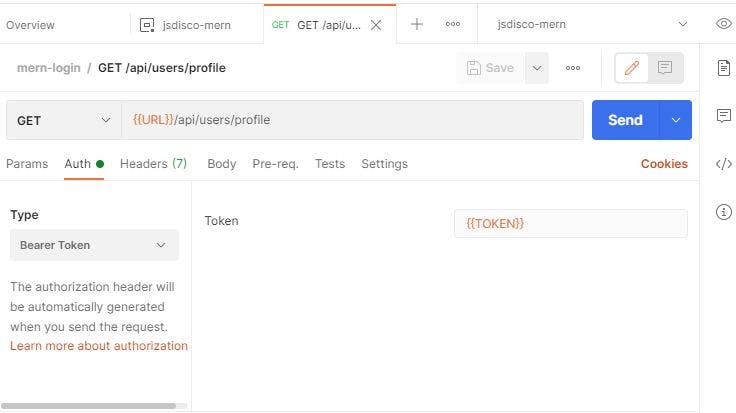
Now, whenever we made a valid POST request to the login route, we'll have a token for that particular user in our environment, and a GET request to their profile page will be responded with their data. If you make a POST request with invalid data and then try to access the profile page, you'll get a 401 Unauthorized error.
This makes it really simple to test your protected routes, especially if you have different types of users (premium, admin).
For the registration route, you can add the same script, so you'll be logged in as a user that has successfully signed up.
✏ What's Next?
In the next post, I'd like to
add a route for a PUT request, to let a user update their profile
refactor the server.js code to make it more scalable
✏ Recap
This post covered:
using async middleware with
express-async-handlergenerating JSON Web Tokens
setting up protected routes with custom authorisation middleware
user registration
advanced configuration of Postman
✏ Thanks for reading!
I do my best to thoroughly research the things I learn, but if you find any errors or have additions, please leave a comment below, or @ me on Twitter. If you liked this post, I invite you to subscribe to my newsletter. Until next time 👋
✏ Previous Posts
You can find an overview of all previous posts with tags and tag search here: