


✏ How to create a React app without CRA
When I started researching this, two words kept coming up: Webpack and Babel.
So far, I'm mildly aware of their existence and have a basic idea what they do:
- Webpack is a bundler
- Babel is a translator
And there the knowledge ends, so - diving head first into the rabbit hole:
✏ What is Webpack?
I'll mostly refer to the documentation, and try not to just paraphrase what I find in there. I won't understand much right now anyway. This stuff is complicated 🥵
The dependency graph
I had been obsessing a bit yesterday about the "node modules dependency monster". Apparently, webpack can tame that monster: It creates a dependency graph. Starting from the entry point, it recursively goes through all dependencies and creates a tree-like structure.
The entry point in a common React application would be ./src/index.js. It usually looks something like this:
import React from 'react'
import ReactDOM from 'react-dom'
import App from './App'

ReactDOM.render(
    <App />,
    document.getElementById('root')
)
As I imagine it, Webpack scans that file and looks for imports. Those are the dependencies of the entry point. It would then go a level deeper and look for the dependencies of 'react', 'react-dom' and 'App'. And so on.
The output
Once that graph is created, Webpack can stuff the code from all the files of your project (not just .js files - everything else that's needed in the app like .css files or even images are treated as dependencies as well) into one big file, usually called bundle.js. This file can then be included in your index.html.
So much for a very short overview. It's still a bit fuzzy in my mind.
✏ What is Babel?
Thankfully, this is much less complicated. Babel is a tool that converts your super modern JavaScript ES6+ code into something that even an ancient browser can understand. It also translates JSX syntax into standard JavaScript.
But now, back to the plan - initialising a React app with the absolute minimum.
✏ Step 1: Setup
First of all, I'll obviously need a project folder. Getting more comfortable with the terminal, I'll do it like the pros do:
mkdir react-without-cra

cd react-without-cra
Initialising npm will create the package.json for me:
npm init
I've left everything on default, it really makes no difference for this experiment. Note how you're asked at some point about what "main" should be. This is the entry point that I've talked about earlier.
✏ Step 2: React
I've already learned yesterday that all I need for React is the react and react-dom modules (you can chain them when installing them):
npm install react react-dom
If you use create-react-app, the whole necessary (and unnecessary) boilerplate will just ZAP be created for you, so I'll have to do that manually now. But to be honest, I'm not sure what's more work - creating the files myself, or cleaning up the default CRA files.
First thing - we need a src folder and the entry point index.js:
mkdir src
cd src
echo > index.js
index.js
import React from 'react'
import ReactDOM from 'react-dom'
import App from './App'

ReactDOM.render(
    <App />,
    document.getElementById('root')
)
The .render method wants to render something called "App" in an element with the id "root", so I'll need an index.html and an App.js file in the src folder:
index.html
<!DOCTYPE html>
<html lang='en'>
    <head>
        <meta charset='utf-8' />
    </head>
    <body>
        <div id='root'></div>
    </body>
</html>
App.js
import React from 'react';

const App = () => <h1>APP...</h1>

export default App
✏ Step 3: Webpack
Webpack also wants to be installed, but not with the usual command npm install webpack. The bundler is something that the client won't need when the app is deployed, the client will instead consume the bundled app, so it's only needed during development. The --save-dev flag will make npm aware of this, and set the entry accordingly in the package.json:
npm install --save-dev webpack webpack-cli
webpack-cli is the webpack command line interface. I'm not 100% sure what it does, except that it allows it to configure the build from the terminal. Find a list of available commands here.
✏ Step 4: Babel
Apparently I need four packages, and again, I don't fully understand this, but the packages are:
- @babel/core (judging from the name, it sounds sort of essential)
- @babel/preset-env (has something to do with which JS version babel should transpile)
- @babel/preset-react (I suspect this is reponsible for transpiling the JSX)
- babel-loader (it loads stuff)
Throwing all that into the terminal:
npm i --save-dev @babel/core @babel/preset-env @babel/preset-react babel-loader
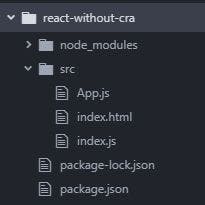
The folder structure now looks like this:
And the package.json has the following entries:
{
  "name": "react-without-cra",
  "version": "1.0.0",
  "description": "",
  "main": "index.js",
  "scripts": {
    "test": "echo \"Error: no test specified\" && exit 1"
  },
  "author": "",
  "license": "ISC",
  "dependencies": {
    "react": "^17.0.1",
    "react-dom": "^17.0.1"
  },
  "devDependencies": {
    "@babel/core": "^7.12.10",
    "@babel/preset-env": "^7.12.11",
    "@babel/preset-react": "^7.12.10",
    "babel-loader": "^8.2.2",
    "webpack": "^5.11.1",
    "webpack-cli": "^4.3.0"
  }
}
✏ Step 5: Configuration files
Webpack
I've read that newer versions of Webpack don't require a configuration file, but I couldn't make it work without one. The file needs to be in the root folder, and the file name is webpack.config.js. It exports an object with some configuration details that looks similar to the package.json:
webpack.config.js
module.exports = {
    "mode": "development",
    "output": {
        "path": __dirname + '/bundle',
        "filename": "bundle.js"
    },
    "module": {
        "rules": [
            {
                "test": /\.(js|jsx)$/,
                "exclude": /node_modules/,
                "use": {
                    "loader": "babel-loader"
                }
            }
        ]
    }
}
The only thing that's absolutely necessary here is the "module": "rules" part.
"test": obviously a regex that looks for.jsand.jsxfile extensions"exclude": I tried removing that rule, and found it utterly confusing that it resulted in a smaller bundle file (with "exclude": ~1MB, without "exclude": ~850kB). A little counter-intuitive but I'll just accept it for now"use": tells webpack which loader to use for the specified file extensions.
If you want to include .css files in the bundle, you'd have to install webpack's css-loader and style-loader, and add another rule like this:
{
    "test": /\.css$/,
    "use": [
        "style-loader",
        "css-loader"
    ]
}
Similar for other file extensions. The other parts of webpack.config.js are sort of self-explanatory. The default "mode" is "production", which results in a minified version of the bundle file. "output" specifies the directory and file name of the bundle.
Babel
To configure Babel, I need to create a file called .babelrc in the root folder, and put the following content into it:
.babelrc
{
  "presets": ["@babel/env", "@babel/react"]
}
That obviously refers to the packages I've installed. I'll just accept that Babel wants this file for some reason.
✏ Step 6: Creating the bundle
The final thing to do is telling webpack to compile my project:
npx webpack
I'm not sure why I need npx, but this will create a bundle.js file in the specified directory.
Adding the script to the index.html:
<!DOCTYPE html>
<html lang='en'>
    <head>
        <meta charset='utf-8' />
    </head>
    <body>
        <div id='root'></div>
        <script src='../bundle/bundle.js'></script>
    </body>
</html>
Now I can start a live server or just open the file in a browser, and there's my React app without create-react-app 😃
Of course it's super basic, you wouldn't want to actually work with such a minimum setup. Whenever you make changes in the code, you'd have to manually re-create the bundle file, you can't import .css files into App.js, etc...
But going through the process has definitely increased my understanding of what create-react-app is doing under the hood.
✏ Misc stuff inside the bundle file
I was curious and scrolled through the file. If you ever thought that your variable names are too long and clumsy, check these out:
var didWarnStateUpdateForUnmountedComponent = {};

var hasWarnedAboutUsingNestedContextConsumers = false;
Well that is what I call descriptive. This one's even better:
exports.__SECRET_INTERNALS_DO_NOT_USE_OR_YOU_WILL_BE_FIRED = Internals;
And finally, this cute error message 😺
 if (true) {
    // This branch is unreachable because this function is only called
    // in production, but the condition is true only in development.
    // Therefore if the branch is still here, dead code elimination wasn't
    // properly applied.
    // Don't change the message. React DevTools relies on it. Also make sure
    // this message doesn't occur elsewhere in this function, or it will cause
    // a false positive.
    throw new Error('^_^');
  }
✏ Recap
I've learned
- how to set up a React project without create-react-app
- to do so, I need to install certain parts of Webpack and Babel, and add a configuration file for each
- Webpack creates a dependency graph of all required modules, and writes the entire code into a bundle file
- Babel is needed to transpile ES6+ and JSX syntax into ES5 JavaScript, which most browsers can understand
- devs have humour
✏ Resources
Some articles that explain how to set up a React project without create-react-app and walk you through the process:
medium.com: How to Create a React Development Build from Scratch
medium.com: Create React App without create-react-app
digitalocean.com: How to Set Up React Using Webpack-4 and Babel-7
✏ Next:
- some more basics of
node.jsandnpm
✏ Thanks for reading!
I do my best to thoroughly research the things I learn, but if you find any errors or have additions, please leave a comment below, or @ me on Twitter. If you liked this post, I invite you to subsribe to my newsletter. Until next time 👋