


✏ Express Handlebars
express-handlebars is a npm package to build your pages with a template engine.
This is a different approach than setting up a backend that serves JSON data from a database, to be processed by and displayed on the frontend. So I'll remove the routes I've added in the last post from the starter code, and also the part that serves static HTML files. Instead, handlebars allow to serve a more versatile HTML template, that will be filled with the desired content on the server.
✏ Setup
import express from 'express';
import path from 'path';
import exphbs from 'express-handlebars';

const app = express();

// handlebars setup
app.engine('hbs', exphbs());
app.set('view engine', 'hbs');


app.listen(3001, ()=>console.log('express is serving'))
After importing exphbs, I need two lines of code to start with:
- create a new engine, give it a name of
hbs(or any other name you like), and set it to the handlebars package - set the view engine to
'hbs'(again, the name you chose)
exphbs() takes a configuration object, where I can for example define the file extension I want to use for my handlebars files (if not set, the default extension is .handlebars), and define a filename for the default layout (main in the example below):
app.engine('hbs', exphbs({
  extname:'hbs',
  defaultLayout: 'main'
}));
The default directory for the location of the layout files is views/layouts, which I'll stick to, but in case you want to change it:
app.engine('hbs', exphbs({
  layoutsDir: path.resolve('./') + '/views/my-layouts
}));
Files & Folders
After setting the directories, folder names and file extensions, I'll start with creating the structure:
- a views folder
- within it, a layouts folder
- within it, the main template file - main.hbs
To illustrate the flow for a very simple page - main.hbs is the template that will be filled with content (the body variable in triple curly braces). Each route now calls a .render method, where I'm passing in the filename (index) and an object to specify the values of the variables in index.hbs:
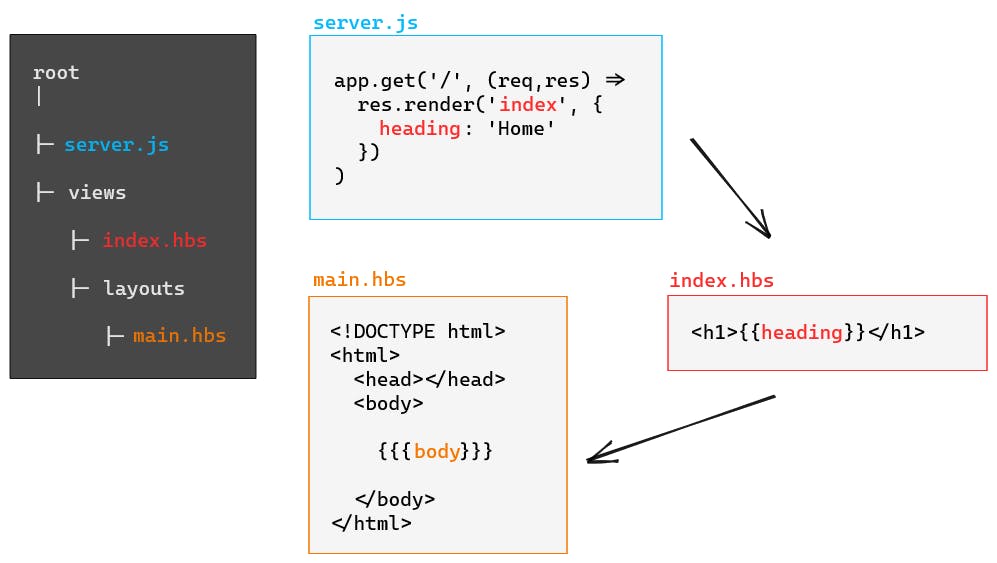
So these are my files now:
main.hbs
<!DOCTYPE html>
<html lang="en">
<head>
    <meta charset="UTF-8">
    <title>{{ title }}</title>
</head>
<body style="font-family:sans-serif">

        {{{body}}}

</body>
</html>
index.hbs
<h1>{{ heading }}</h1>
Now use the .render method (the parameter passed in refers to the filename again):
express.js
app.get('/', (req,res) =>
    res.render('index', {
        title: 'Express HBS | Home',
        heading: 'Express Handlebars'
    })
)
Note that I can put both variables there, although the title variable will be used in main.hbs, the heading in index.hbs.
Double and Triple Curly Braces
The difference between the two is that anything written in triple braces like {{{body}}} will be rendered as HTML (sort of like myElement.innerHTML). Everything within double braces will be rendered as plain text (like myElement.textContent).
These two are doing the same:
/* index.hbs */
<h1>{{ heading }}</h1>

/* server.js */
app.get('/', (req,res) =>
    res.render('index', {
        heading: 'Express Handlebars'
    })
)
/* index.hbs */
{{{ heading }}}

/* server.js */
app.get('/', (req,res) =>
    res.render('index', {
        heading: '<h1>Express Handlebars</h1>'
    })
)
It seems to be odd though to pollute the returned object with html tags, it makes more sense to put those into the template file, and only fill them with text.
✏ Helper Functions and Syntax
handlebars comes with a few helper functions that allow to write conditionals and loops. Generally, if I want to insert a code block, add a # to the opening curly braces, followed by a keyword. To close the block, put the keyword, preceded by a /.
If Statements
For conditional rendering, I could include a Boolean in the object that I pass to the render method:
express.js
app.get('/', (req,res) =>
    res.render('index', {
        title: 'Express HBS | Home',
        heading: 'Express Handlebars',
        condition: true
    })
)
To use this in the index.hbs template:
index.hbs
<h1>{{ heading }}</h1>
{{# if condition }}
<h2>The condition is true</h2>
{{ else }}
<h2>The condition is false</h2>
{{/ if }}
Loops
Let's say I pass an array of objects (listItems) to the render method. The syntax is as above, just with the each keyword. Each item of the array can then be accessed through the this keyword:
index.hbs
<h1>{{ heading }}</h1>
<ul>
    {{# each listItems}}
        <li>{{ this.title }}</li>
    {{/ each }}
</ul>
There's a lot more to say about handlebars, I've only covered the basics, but I don't think I'll need this much in a MERN application, where the frontend is built with React. It was cool though to understand server-side rendering, but I'm actually itching to start the next big chapter: MongoDB
✏ Recap
I've learned
- how a template engine works
- specifically, how to use
express-handlebars
✏ Next:
- MongoDB
✏ Thanks for reading!
I do my best to thoroughly research the things I learn, but if you find any errors or have additions, please leave a comment below, or @ me on Twitter. If you liked this post, I invite you to subsribe to my newsletter. Until next time 👋
✏ Previous Posts
- Day 1: Introduction, Node.js, Node.js in the terminal
- Day 2:
npm, node_modules,package.jsonandpackage-lock.json, local vs global installation of packages - Day 3: Create a React app without create-react-app, Webpack, Babel
- Day 4:
npxand cowsay - Day 5:
npmvs.npx,npm audit, semantic versioning and update rules - Day 6: Call stack, event loop, JavaScript engine, JavaScript runtime
- Day 7: Call stack and event loop in Node.js,
setImmediate() - Day 8:
setImmediate(),process.nextTick(), event loop phases in Node.js - Day 9: Network requests with
XMLHttpRequestand callbacks - Day 10: Promises
- Day 11: Network requests with
XMLHttpRequestand Promises - Day 12: React Quiz App part 1
- Day 13: React Hangman
- Day 14: FullStackOpen course 1: details of GET and POST requests, request headers
- Day 15: React Hangman: Trigger fetch with click event callback vs useEffect
- Day 16: REST API and CRUD
- Day 17: Boring Book App part 1: React Frontend, Express Backend, GET requests, CORS
- Day 18: Boring Book App part 2: POST request, File System API
- Day 19: Boring Book App part 3: Request Parameters, DELETE request
- Day 20: Boring Book App part 4: PUT request
- Day 21: Express JS vs Vanilla JS part 1: Server setup, routes
- Day 22: Express JS vs Vanilla JS part 2: Serve static files with Vanilla Server
- Day 23: Express JS vs Vanilla JS part 3: Serve static files with Express Server, Middleware
- Day 24: Express JS: express.Router, Postman